With each successor of Windows Operating system, the new versions of Windows demanded more RAM, CPU and hard disk space for obvious purpose. They have more tools & features. They can process much large & complicated files. They have more security features, data backup & recovery options, etc.
Windows 8/8.1 & 10 also have better features than former Windows operating systems but they have a serious problem – the 100% disk usage issue. Firstly these Windows versions already require more resources and then this issue is making Windows 8/8.1 & Windows 10 to use all the disk resource available.

Even if you aren’t doing anything serious in your Windows 8 or 10 PC, do you feel the system is slowing down? Check “Processes” tab in Task Manager, it might be showing 100% disk usage. If you are facing this problem then today I am telling you how to stop 100% disk usage issue in Windows 8/8.1 or Windows 10.
Find What Processes Are Causing Load on Disk
Open Task Manager by right-clicking on Task bar and choosing “Task Manager” from the context menu. Now, at the processes tab check which processes are causing load on your hard disk. Usually, processes are already sorted with High-to-Low disk usage but if they aren’t sort processes by disk usage order by clicking on Disk Label appearing at the top.
Now, check which processes are causing high disk usage in your Windows system.
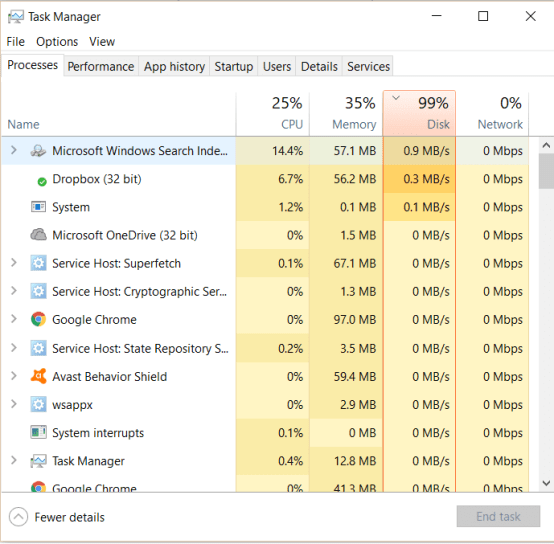
Usually in most of the cases, Microsoft Windows Search Indexer service is responsible for this abnormally high disk usage. In Windows 8/8.1 and Windows 10, Windows Search Indexer services is going into loops of requesting & fetching data from the hard disk for no productive results which is causing the issue.
If any other processes are also putting load in your disk, you may want to stop those processes by right-clicking the specific process and select “End Task”.
Now, to lower down your Windows 100% Disk Usage, you need to stop Microsoft Windows Search Indexer Service.
Temporarily Stop Microsoft Windows Search Indexer Service
Firstly we will temporarily stop Windows search service to check if it helps in lowering down Windows 100% disk usage. If it helps, we will permanently stop Windows search indexer service.
To stop Windows search Indexer service temporarily, please follow these steps:
Step 1: In Start Menu search box, type cmd. Command prompt will appear in the search result. Right Click on it and select “Run as Administrator” to open Command prompt in Administrator mode.

Step 2: Now, type net.exe stop “Windows search” and hit ENTER. The command will stop Microsoft Windows Search Indexer service temporarily.

Now open Task Manager and check in either “Processes” or “Performance” Tab if your Windows Disk usage percentage lowered down or not. You should also scroll down quickly in Processes tab to see if Microsoft Windows Search Indexer service stopped or not.

If it helps in lowering down your Windows high disk usage, and your PC runs smoothly after that then read below to know how to stop Windows search indexer service permanently because Windows Search service will automatically start after few minutes if any background process calls it or you restart your system.
Stop Microsoft Windows Search Indexer Service Permanently
Top stop Microsoft Windows Search Indexer Services permanently, follow these below steps:
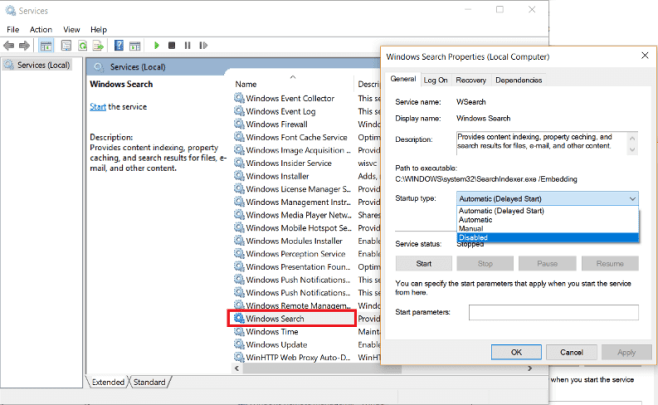
Open Run dialogue box by using Windows + R shortcut keys, type services.msc in Run dialogue box and hit ENTER. This will open Windows Services windows.

Here, scroll down to locate Windows search service. Once you find, double-click on it to open Windows search Property window. Here, check the Service status, if it says Running then click on Stop button to stop the service. Now, in “Startup Type” option, choose Disabled. Finally click Apply and then OK button available at the bottom of the window.
Now, you’ve stopped Windows search service permanently. So the issue of 100% Disk usage is resolved in your Windows system. If you are still facing performance issues then read this article to know how to boost your CPU & Processor’s speed.