Along with being one of the most rewarding technology, Internet has become one of the most destructive technology too which can really destroy you if you don’t handle it properly. If you get even a little careless while using the Internet, your confidential files, credit card number, account passwords, private photos & videos will be fetched by hackers remotely. They can remotely hack your PC, webcam, spy your online activities, blackmail you and destroy your data as per their comfort.
In past, I have told many tips and tricks to keep you safe and protect your privacy online and among them, the best way I always recommended is to use a VPN. VPN (Virtual Private Network) comes with ultra-level security and protection which gets applied to your internet connection when you install a VPN service on your PC. It provides you many server locations which you can use to hide your IP, browse anonymously and unblock many websites, YouTube videos &services which are otherwise blocked in your region.

So, due to so many benefits, if you want to install a VPN service on your PC then we have recently published the list of best VPN services for Windows PC. You can pick any VPN software you’d like from the list. Almost each of them comes with VPN software which you can install on your PC you connect to the Internet via VPN using a simple “Connect” button available in the software. But, if you don’t want to use a VPN software or can’t install it for some reasons then Windows 10 has inbuilt settings to that let you set up any VPN service to your PC easily.
Steps to Set up VPN in Windows 10
Windows 10 allows you to connect to VPN in 4 type – Point to Point Tunneling protocol (PPTP), L2TP/IPSec, Secure Socket Tunneling Protocol (SSTP) and IKEv2. For all of these connections type, steps are similar. However, they vary in Speed, Stability and Security. There is an “automatic” VPN type which will automatically select the VPN setting which is best for your Internet. But, if you manually want to select one, check out there rank for every factor below:
- Speed: L2TP/IPSec < PPTP < SSTP < IKEv2
- Stability: L2TP/IPSec = PPTP = SSTP = IKEv2
- Security: PPTP < L2TP/IPSec < SSTP < IKEv2
Now, whichever method you want to pick to connect to VPN in your Windows 10 PC, follow these below steps to setup any VPN service to your Windows 10 system:
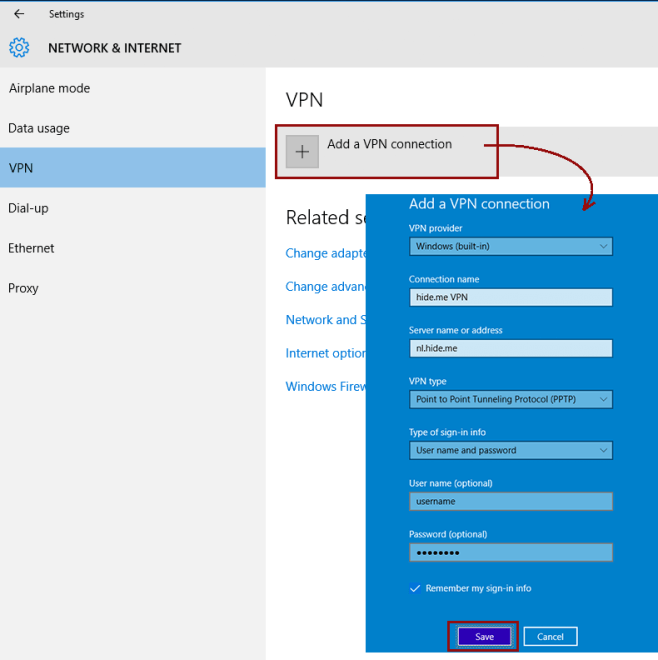
Step 1: Click on the Internet icon available on the bottom-right corner of your taskbar and then click “Network & Internet Settings”. From here, click on VPN button available on the left sidebar.

Step 2: On the VPN window, click the “+” button saying “Add a VPN Connection”. It will open a pop-up window to enter credentials of your VPN service. To demonstrate the process, I am using Hide.me VPN but of course you can try other services, steps will be the same.
Step 3: Now, after clicking Save, you’ll see your VPN added to the VPN list. The process is not over, you need to configure your adapter settings too. So, click on “Change adapter options”.

Step 4: Here, you’ll see a new network adapter with your VPN name. Right-click on it and select “Properties”. On the Properties dialogue box, go to Security tab, select the VPN Type as PPTP if you’ve used it earlier or any other type which you’ve used in Step 2. If you’ve selected L2TP/IPSec then you might need to enter login credentials again here, otherwise, click OK.

Step 5: Now, click “Connect” to establish VPN connection. And, you can check either through the VPN service or your browser (if you’ve changed your IP) or querying your IP address.

Now, you’ve successfully connected the desired VPN service to your Windows PC. You can open your VPN account through their website and they’ll tell you the status of their service. As you can see below, Hide.me VPN is telling me that the VPN is successfully connected and properly working.

Now, whenever you want to disable VPN protection from your PC, just click on the “Disconnect” button which is now appearing below the VPN settings in the place of “Connect” button which was appearing earlier.